Monday, April 18, 2016

Apperture, Shutter and ISO

Previously we saw how the 3 functions: Aperture, Shutter and ISO function when used independently. But this is never the case, when even we click a photo all 3 are playing their role thus when we clock a photo to get the desired effect we must consider all together.


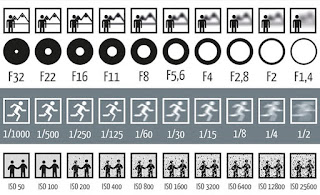
Primary use of the 3 should for the following:

  • Apperture: Based on whether the object is close (portrait) or far (landscape). For portrait, use high aperture and for landscape, use low aperture.
  • Shutter speed: Based on the movement of the object. If the object is moving fast for his speed. if the object is stationary or has minimalistic movement use a lower shutter speed.
  • ISO: Based on the lighting around and how bright you want the picture to be. If there is enough lighting, use low ISO, if there is less lighting use high ISO. Similarly if you want a brighter photo use high ISO than what you are using currently.

Understanding ISO

The ISO number relates to the sensitivity of the camera to the surrounding lights. Now when there is too much light around, the camera need not be too sensitive of the light around as there is enough light for the sensors to pick up from. In case there is low lighting, the use must tell the camera to be extra sensitive to the light around so as to capture the maximum possible light. Thus ISO is a function which tells the camera how sensitive the sensor must be to the surrounding light.


The problem comes when the ISO is too high. As the sensors become extra sensitive to the light around, they try extra hard to capture what ever they can. This leads to capturing of noise around. This at very high ISO we will observe that the pixels in the photograph tend to break. If we use a high ISO in a well lit area, the photo will be so bright that it will almost be white as the sensor will try to capture all the light (even more than required)

Thus ISO setting depend on the following:

  • Surrounding light: if the lighting is poor, increase the ISO but not too much. When there is sufficient light, Keep the ISO level low. This can relate to indoors (low lighting) and outdoors (high lighting) respectively.
                                     
  • Photo detail: If more detailed photo is required, then the ISO must be kept low as the sensors capture what is visible to it. In case less detail is required but more brightness (brightness gets compromised when detail is increased and vice-versa) keep ISO high.
                                     

Conclusion:
  • High ISO: low lighting, less detailed but bright photo required and indoors
  • Low ISO: High lighting, more detail (natural colors) required and outdoors.

Understanding Shutter Speed

Shutter speed is analogous to the blink of ones eye. It is about how much motion of an object is captured on the retina in that one blink. If the object is moving fast and you blink fast, the image recorded will be sharp. In case you blink slowly the image recorded will be overlap of several motions of the object giving a blurred image.

In similar way Shutter speed must be adjusted to capture images based on the following factors:


  • Motion of the object: If the object is moving too fast, the shutter speed must be kept high so that a freeze or a still motion of the object can be caught. In the object is moving slow or is stationary the shutter speed can be reduced accordingly.
                                  
  • Light of the surrounding: If there is too much light in the surrounding, the shutter speed can be reduced to reduce the amor of exposure thus the amount of light entering the lens. If the mound go light is less in the surrounding, the shutter speed can be kept high to let more light hit the lens.


Thus conclusion: 
  • High Shutter speed: Fast moving objects (to get still pic), high lighting
  • Low shutter speed, still object, when you want continuous picture of moving object (waterfall) and low lighting)
                                          

Understanding Apertures

Aperture of a camera is like the opening of our eye, all called pupil. The pupil of an eye has many functions, but analogue to the aperture of the camera we can learn the following things (here we will learn each of the elements of camera independent of other feature available on the camera to understand each of the functions independently):


  • Control entry of light: When it is dark, the pupil expands to allow more light to come in and when there is too much light around, it contracts to restrict the entry of flight to have a perfect vision. Thus when there is less light, to capture the perfect image more light has to enter thus one must choose high aperture. In case there is too much light, the aperture size must be reduced to reduce the amount of light entering the lens.
                                   

  • To manage distance of the object: When we have to see objects very close to us our pupils tend to widen to form a cone such that all the other light form objects around do not distract our vision. Thus results in luring of everything else. Example when we put our palm very close to our eyes and try to focus on it, all the otters distant objects go out of focus. Similarly when we have to view object at a very large distance, we tend to skew our eye, thus decreasing the site of aperture to let everything in the vision to be in focus. Similarly in a camera, when we need to focus on closer objects (such as in case of portrait) we must choose high aperture, this will also lead to bluing of all the background. In case we want a landscape picture, where we need all the objects in the distance in focus, we use a lower aperture. 
                                  
  • Depth of field: Now Taking forward the previous point ahead, when aperture is large on the object in focus will be clear, thus the depth of field is low and when the aperture is high, the depth will be high, as all of the background will be in sight.

Thus in conclusion to recollect all Use
  • Large aperture for: Portrait, low lighting, for low depth and blurred background
  • Small aperture for: Landscape, high lighting, how high depth and clear background